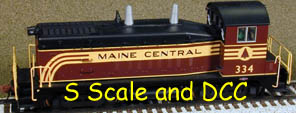
Congratulations on your new Showcaseline S Scale Train Set, with its included Lenz Set-100 DCC starter set. There is complete documentation on both the trains and the DCC set in your package. The purpose of this document is to get you up and running right away! After you have everything running well, you can read all the documentation to understand all your options, or just save the documentation as a reference for when you need it!
 |
 |
You are now ready to select your locomotive, and run! The DCC system communicates with locomotives on the track (actually the DCC decoder in the locomotive) by means of an "address". The addresses available on the Lenz system are from 1-9999 (address 0 is for operating a loco without a decoder in it). Most people assign an address to a locomotive based on its road number. The locomotive that came in your set follows this scheme. Thus, to control your locomotive, you need to select its road number on the LH100 throttle.
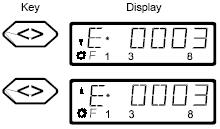
| Press | On the display you see | Explanation |
| Cl | This clears the display so that you can enter a new address | |
| 1 | Begin by entering the first digit of the road number | |
| 234 | Continue with the rest of the road number. It can be 1 to 4 digits. You don't need leading zeros | |
| Enter | Confirm the address by pressing Enter. The display now shows Engine 1234, the up arrow means it is going forward, and the light symbol to the left of the F means the lights are turned on. |
Now you are ready to run your train! Here's how you control your locomotive:
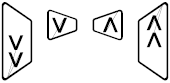 |
Loco speed is controlled with these four buttons. The single up arrow increases speed by one step (the minimum amount) the single down arrow decreases speed the same way. The double up arrow increases speed by several steps, the double down decreases it the same way. Experiment speeding up and slowing down. |
| Whenever you change speed the display changes to a "Velocity" screen which shows the speed step you are on. The default is 28 speed steps, so the number will range from 0 (stopped) to 28 (full speed). You can toggle between the Engine display and the Velocity display by pressing Enter. | |
 |
The direction of travel key toggles the locomotives direction, which will be shown by the small up or down arrow at the left of the display. The loco has to be stopped for the reversing to happen. If the loco is moving when you press this key, it immediately stops. Press it again to reverse direction. |
| And finally, the emergency stop key stops all locomotives on the layout. Pressing it again lets operation resume. |
That's it! You are up and running. There is one more thing I'd like to cover here, and that is Functions. Functions are the way you control lights, sound, and some other features on your locomotive. You always control functions the same way, but they sometimes do different things on different locomotives. The functions currently used on Showcaseline locomotives are Functions 0 through 8, normally shown as F0, F1 ... F8. You turn a function on by pressing the corresponding key on the LH100. Key 0 turns on F0, Key 1 turns on F1, etc. Pressing the key again turns it off.
Several functions are the same on all Showcaseline DCC Sound locomotives:
| F0 | Turns headlight/Rear headlight on/off |
| F1 | Turns Bell on/off |
| F2 | Turns horn or whistle on/off. This can be made momentary, we'll cover that elsewhere. |
| F8 | Mutes sound. (turn F8 off to hear sound again). |
Try it! Press 0 and the Headlight should come on if your loco direction is forward. Directional lights is the standard, but you can change it. Press 1 and the Bell should start ringing. Press it again to shut it off. The motor sound is automatic, and changes with speed.